Vibration Phase Analysis
In many cases, vibration diagnostics by vibration spectra does not help to accurately identify the defect. And additional diagnostic methods come to the rescue, including phase analysis. A small and very informative article will teach you how to use this tool effectively. I am sure that for very experienced vibrodiagnostics the information will seem interesting.
Introduction
Vibration analysis is mostly a learned skill. It is based 70 percent on experience and 30 percent on classroom training and self study. It takes years to become a confident and competent vibration analyst. When the analysis is wrong, the recommendations for repair also will be incorrect. No vibration analyst wants to make the wrong call. In this business, credibility is gained in small steps and lost in large chunks.
A vibration sensor placed on a bearing housing and connected to a vibration analyzer provides time, frequency and amplitude information in the form of a waveform and a spectrum (Figure 1). This data is the foundation for vibration analysis. It contains the signatures of nearly all mechanical and electrical defects present on the machine.
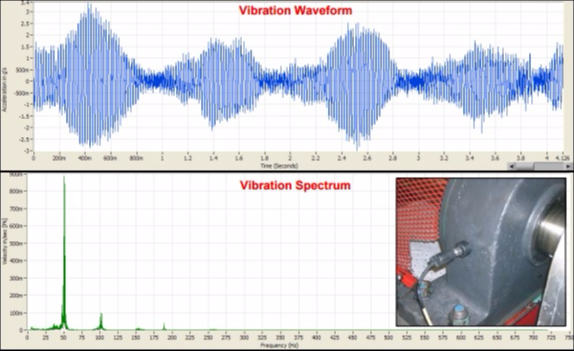
The vibration analysis process involves determining the vibration severity, identifying frequencies and patterns, associating the peaks and patterns with mechanical or electrical components, forming conclusions and, if necessary, making recommendations for repair.
Everybody involved in vibration analysis knows that analyzing vibration is not easy nor automated. Have you ever wondered why? Here are a few reasons:
1) Machines Have Multiple Faults: The vibration patterns we learn in training and read about in books just don’t look the same in the real world. We learn how mechanical and electrical faults look in the purest form – as if there was always only that one problem on the machine causing vibration. Machines usually have more than one vibration-producing fault. At a minimum, all machines have some unbalance and misalignment. When other faults develop, the waveform and spectrum quickly become complicated and difficult to analyze. The data no longer matches the fault patterns we have learned.
2) Cause and Effect Vibration: For every action, there is a reaction. Some of the vibration we measure is the effect of other problems. For example, the force caused by rotor unbalance can make the machine look like it is out of alignment, loose or rubbing. Consider all of the things that shake and rattle on your car when one tire goes out of balance.
3) Many Fault Types Have Similar Patterns: Because machine rotors rotate at a particular speed, and vibration is a cyclical force, many mechanical and electrical faults exhibit similar frequency patterns that make it difficult to distinguish one fault from another.
Learning to analyze vibration just takes time. Training courses, technical publications and other resources such as online resources and commercial self teaching material are available that can improve analysis skills and shorten the learning curve.
There is one diagnostic technique which quickly gets to the source of most vibration problems. It is possibly the most powerful of all vibration diagnostic techniques. It has been around as long as vibration analysis itself yet hasn’t gotten a lot of attention, and it’s rare to find good information about the subject. What is this technique? It’s called phase analysis.
What is Phase?
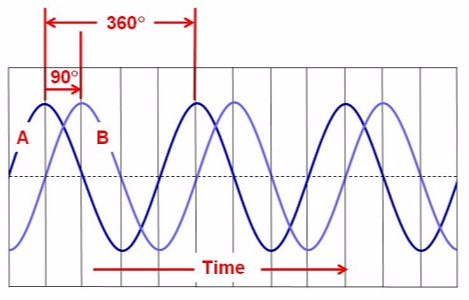
Phase is the position of a rotating part at any instant with respect to a fixed point. Phase gives us the vibration direction. Tuning a car engine using a timing light and inductive sensor is an application of phase analysis (Figure 2).

A phase study is a collection of phase measurements made on a machine or structure and evaluated to reveal information about relative motion between components. In vibration analysis, phase is measured using absolute or relative techniques.
Absolute phase is measured with one sensor and one tachometer referencing a mark on the rotating shaft (Figure 3). At each measurement point, the analyzer calculates the time between the tachometer trigger and the next positive waveform peak vibration. This time interval is converted to degrees and displayed as the absolute phase (Figure 4). Phase can be measured at shaft rotational frequency or any whole number multiple of shaft speed (synchronous frequencies). Absolute phase is required for rotor balancing.
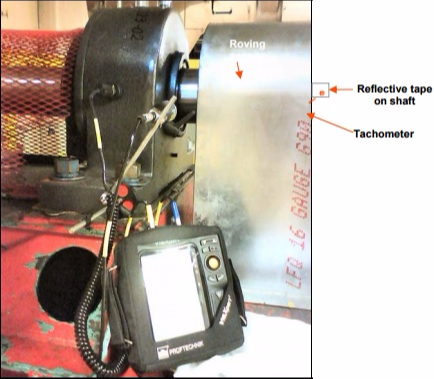
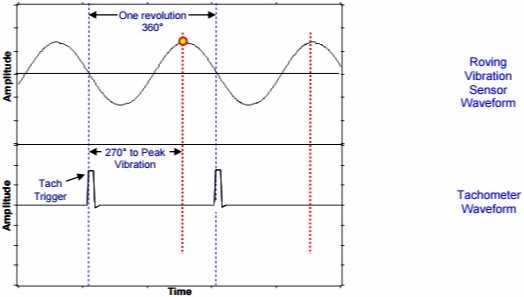
Relative phase is measured on a multi-channel vibration analyzer using two or more (similar type) vibration sensors. The analyzer must be able to measure cross-channel phase. One single-axis sensor serves as the fixed reference and is placed somewhere on the machine (typically on a bearing housing). Another single-axis or triaxial sensor is moved sequentially to all of the other test points (Figure 5). At each test point, the analyzer compares waveforms between the fixed and roving sensors. Relative phase is the time difference between the waveforms at a specific frequency converted to degrees (Figure 6). Relative phase does not require a tachometer so phase can be measured at any frequency.
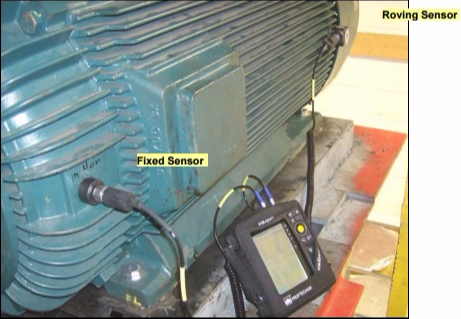
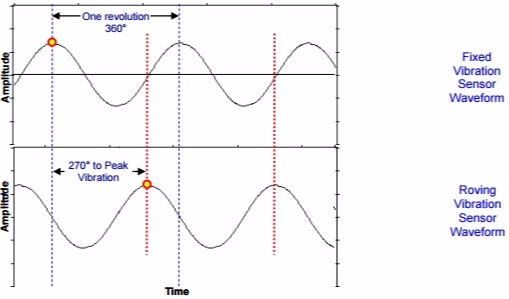
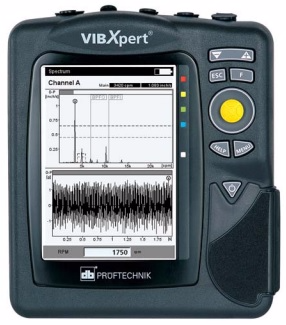
Both types of phase measurements are easy to make. Relative phase is the most convenient way to measure phase on a machine because the machine does not need to be stopped to install reflective tape on the shaft. Phase can be measured at any frequency. Most single-channel vibration analyzers can measure absolute phase. Multi-channel vibration analyzers like the Pruftechnik VibXpert illustrated in Figure 7 have standard functions for measuring both absolute and relative phase.
When to use Phase Analysis
Everyone needs phase analysis. A phase study should be made on problem machines when the source of the vibration is not clear or when it is necessary to confirm suspected sources of vibration. A phase study might include points measured only on the machine bearings or it can include points over the entire machine from the foundation up to the bearings. The following are examples of how phase can help analyze vibration.
Soft Foot
The term soft foot is used to describe machine frame distortion. It can be caused by a condition where the foot of a motor, pump or other component is not flat, square and tight to its mounting, or many other things, such as machining errors, bent or twisted feet and non-flat mounting surfaces. Soft foot increases vibration and puts undue stress on bearings, seals and couplings. Soft foot on a motor distorts the stator housing creating a non-uniform rotor to stator air gap resulting in vibration at two times line frequency.
A good laser shaft alignment system should be used to verify soft foot by loosening the machine feet one at a time.
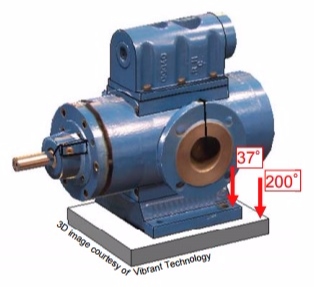
Phase can be used to identify soft foot while the machine is in operation. Measure vertical phase between the foot and its mounting surface. If the joint is tight, the phase angle is the same between surfaces. If the phase angle is different by more than 20 degrees, the foot is loose or the machine frame is cracked or flimsy. Figure 8 is an example of the phase shift across a soft foot.
Cocked Bearings and Bent Shafts
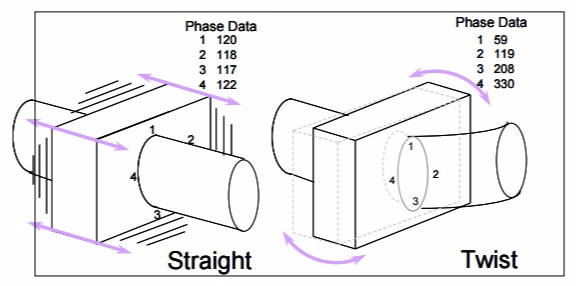
Phase is used to detect cocked bearings and bent shafts. Measure phase at four axial locations around the bearing housing. If the bearing is cocked or the shaft is bent through the bearing, the phase will be different at each location. If the shaft is straight and the bearing is not twisting, the phase will be the same at each location (Figure 9).
Confirm Imbalance
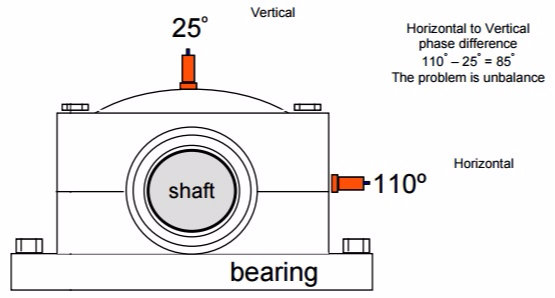
A once-per-revolution radial vibration usually means rotor unbalance. Use phase to prove imbalance is the problem. To confirm imbalance, measure the horizontal and vertical phase on a shaft or bearing housing. If the difference between the phase values is approximately 90 degrees, the problem is rotor unbalance (Figure 10). If the phase difference is closer to zero or 180 degrees, the vibration is caused by a reaction force. An eccentric pulley and shaft misalignment are examples of reaction forces.
Looseness, Bending or Twisting
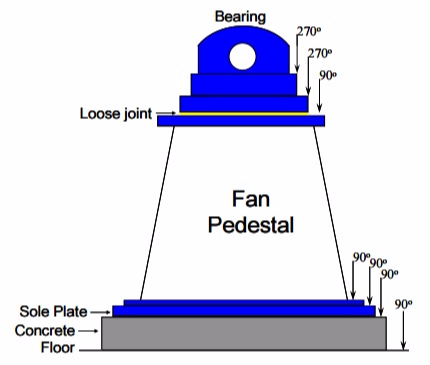
Phase is used to detect loose joints on structures and bending or twisting due to weakness or resonance. To check for looseness, measure the vertical phase at each mechanical joint as indicated by the arrows in Figure 11. When joints are loose, there will be a phase shift of approximately 180 degrees. The phase angle will not change across a tight joint.
Shaft Misalignment
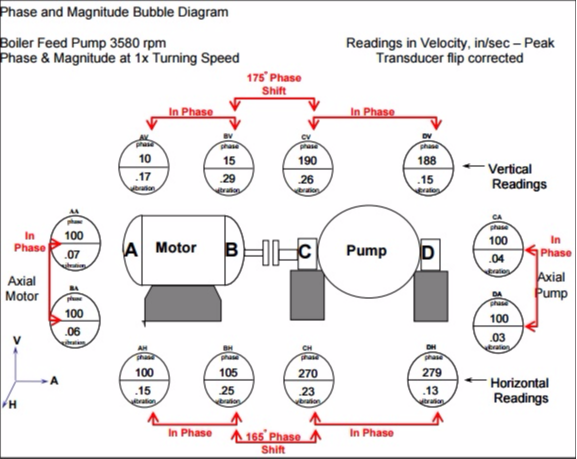
Shaft misalignment is easily verified with phase. Measure each bearing in the horizontal, vertical and axial directions. Record the values in a table or bubble diagram as shown in Figure 12. Compare the horizontal phase from bearing to bearing on each component and across the coupling. Repeat the comparison using vertical then axial data. Good alignment will show no substantial phase shift between bearings or across the coupling. The machine in Figure 12 has a 180-degree phase shift across the coupling in the radial directions. The axial directions are in-phase across the machine. The data indicates parallel (offset) shaft misalignment.
Operational Deflection Shapes
Instead of comparing the phase and magnitude numbers from a table or bubble diagram, operational deflection shape software (ODS) can be used to animate a machine drawing. An ODS is a measurement technique used to analyze the motion of rotating equipment and structures during normal operation. An ODS is an extension of phase analysis where a computer-generated model of the machine is animated with phase and magnitude data or simultaneously measured time waveforms. The animation is visually analyzed to diagnose problems. ODS testing is able to identify a wide variety of mechanical faults and resonance issues such as looseness, soft foot, broken welds, misalignment, unbalance, bending or twisting from resonance, structural weakness and foundation problems.
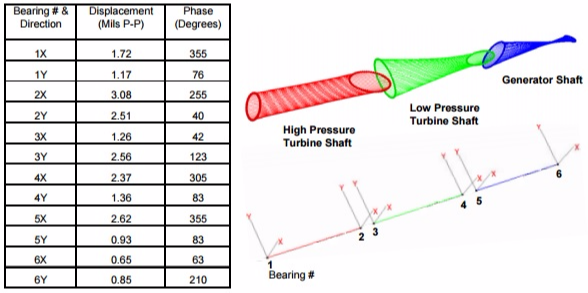
Figure 13 is a simple ODS of three direct-coupled shafts. Phase and magnitude were measured from permanently mounted X and Y displacement probes on a turbine generator. The values listed in the table were used in ODS software to animate a stick figure drawing of the high- and low-pressure turbine shafts and the generator shaft. The picture to the right of the table is a capture from the ODS animation showing the vibration pattern of each shaft and the relative motion between shafts at 3,600 cycles per minute (turning speed).
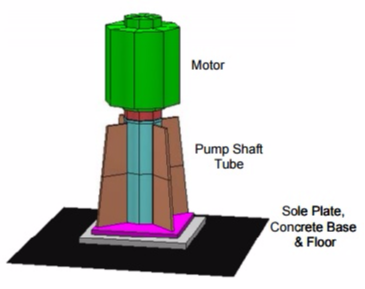
Many machines vibrate due to deteriorated foundations, looseness, resonance of the support structure and other problems that occur below the machine bearings. A phase study might include hundreds of test points measured all over the machine and foundation. Good ODS software can make it easier to analyze phase and magnitude data from a large number of test points. Analysis of an ODS involves observation and interpretation of the machine in motion. Figure 14 is an ODS structure drawing of a vertical pump.
Conclusion
Condition-based vibration testing is a vital component of a reliability based maintenance program. Vibration sensors, instruments and software are able to provide key information about machine health. The weak link in the chain is the analyst’s ability to interpret the data, accurately diagnose the problem and trend the fault until it is time to recommend corrective action. Phase analysis is a very powerful diagnostic tool. Every vibration analyst should be using phase to improve vibration analysis accuracy.
About the author: Tony DeMatteo is a vibration analyst and technical training instructor with 4X Diagnostics LLC.